

Have you ever dreamed of enjoying the bold, savory flavors of sushi without the fuss of rolling? Say hello to the Sushi Bake Recipe—a creamy, decadent dish that’s as easy to make as it is delicious. Picture this: layers of perfectly seasoned sushi rice, a luscious crab and cream cheese mixture, and a golden, bubbling topping that’s pure comfort in every bite. Sounds irresistible, doesn’t it?
This crowd-pleasing casserole is perfect for busy weeknights, potlucks, or even a fun family dinner. It’s a make-ahead marvel that’s as versatile as it is flavorful—whether you’re a sushi enthusiast or just looking for a new dish to spice up your routine. Ready to create a dish that’s sure to wow? Let’s dive into this easy sushi bake recipe and bring a taste of Japan to your table!
Table of Contents
Key Benefits
Looking for a dish that’s as easy to make as it is delicious? This Sushi Bake Recipe is here to save the day! Here’s why it’s a must-try:
- Creamy, Decadent, and Addictive: Think layers of perfectly seasoned sushi rice, a luscious crab and cream cheese mixture, and a golden, bubbling topping. It’s comfort food with a Japanese twist!
- Perfect for Any Occasion: Whether it’s a cozy family dinner, a potluck with friends, or a party centerpiece, this dish is a guaranteed crowd-pleaser.
- Simple and Stress-Free: No sushi-rolling skills required! This casserole-style dish is beginner-friendly and comes together in no time.
- Customizable to Your Taste: Love spice? Add sriracha. Prefer seafood? Swap in shrimp or salmon. The possibilities are endless!
This baked sushi casserole is not just a meal—it’s an experience. It’s the perfect way to enjoy the flavors of sushi without the fuss. Ready to dive in? Let’s get started!
Ingredients
Before we dive into the cooking process, let’s gather all the ingredients you’ll need to create this creamy, dreamy Sushi Bake. Here’s your shopping list:
For the Sushi Rice:
- 2 cups sushi rice (short-grain works best!)
- 2 ½ cups water
- ¼ cup rice vinegar
- 2 tbsp sugar
- 1 tsp salt
For the Creamy Filling:
- 8 oz cream cheese, softened
- 1 cup Japanese mayo (Kewpie mayo is ideal for its rich flavor)
- 1 lb crab sticks, shredded (or imitation crab for a budget-friendly option)
- 1 tbsp soy sauce
- 1 tsp sesame oil
For the Topping:
- ½ cup Japanese mayo
- ½ cup shredded mozzarella cheese (or a mix of mozzarella and cheddar for extra cheesiness)
- 2 tbsp furikake (for that authentic umami flavor)
- 2 sheets nori (seaweed), thinly sliced for garnish
Optional Add-Ons:
- Sliced green onions
- Toasted sesame seeds
- Sriracha or spicy mayo for a fiery kick
Ingredient Tips and Swaps:
- Sushi Rice: Rinse the rice until the water runs clear to avoid a gummy texture. Short-grain rice is key for that perfect sticky consistency.
- Japanese Mayo: If you can’t find Kewpie mayo, mix regular mayo with a splash of rice vinegar and a pinch of sugar for a similar tangy-sweet flavor.
- Protein Options: Not a fan of crab? Try cooked shrimp, smoked salmon, or even shredded chicken for a unique twist.
- Vegetarian Version: Swap the crab for diced avocado, cucumber, or marinated tofu.
- Furikake: This Japanese seasoning is a game-changer! If unavailable, a mix of toasted sesame seeds, crushed nori, and a pinch of salt works as a substitute.
With these ingredients ready, you’re all set to create a show-stopping Sushi Bake that’s as easy to make as it is delicious. Ready to get started? Let’s move on to the step-by-step instructions!
How to Make Sushi Bake Recipe
Let’s roll up our sleeves and make this rich, crowd-pleasing Sushi Heat together! I’ll direct you through each step with tips and traps to guarantee your dish turns out perfectly.
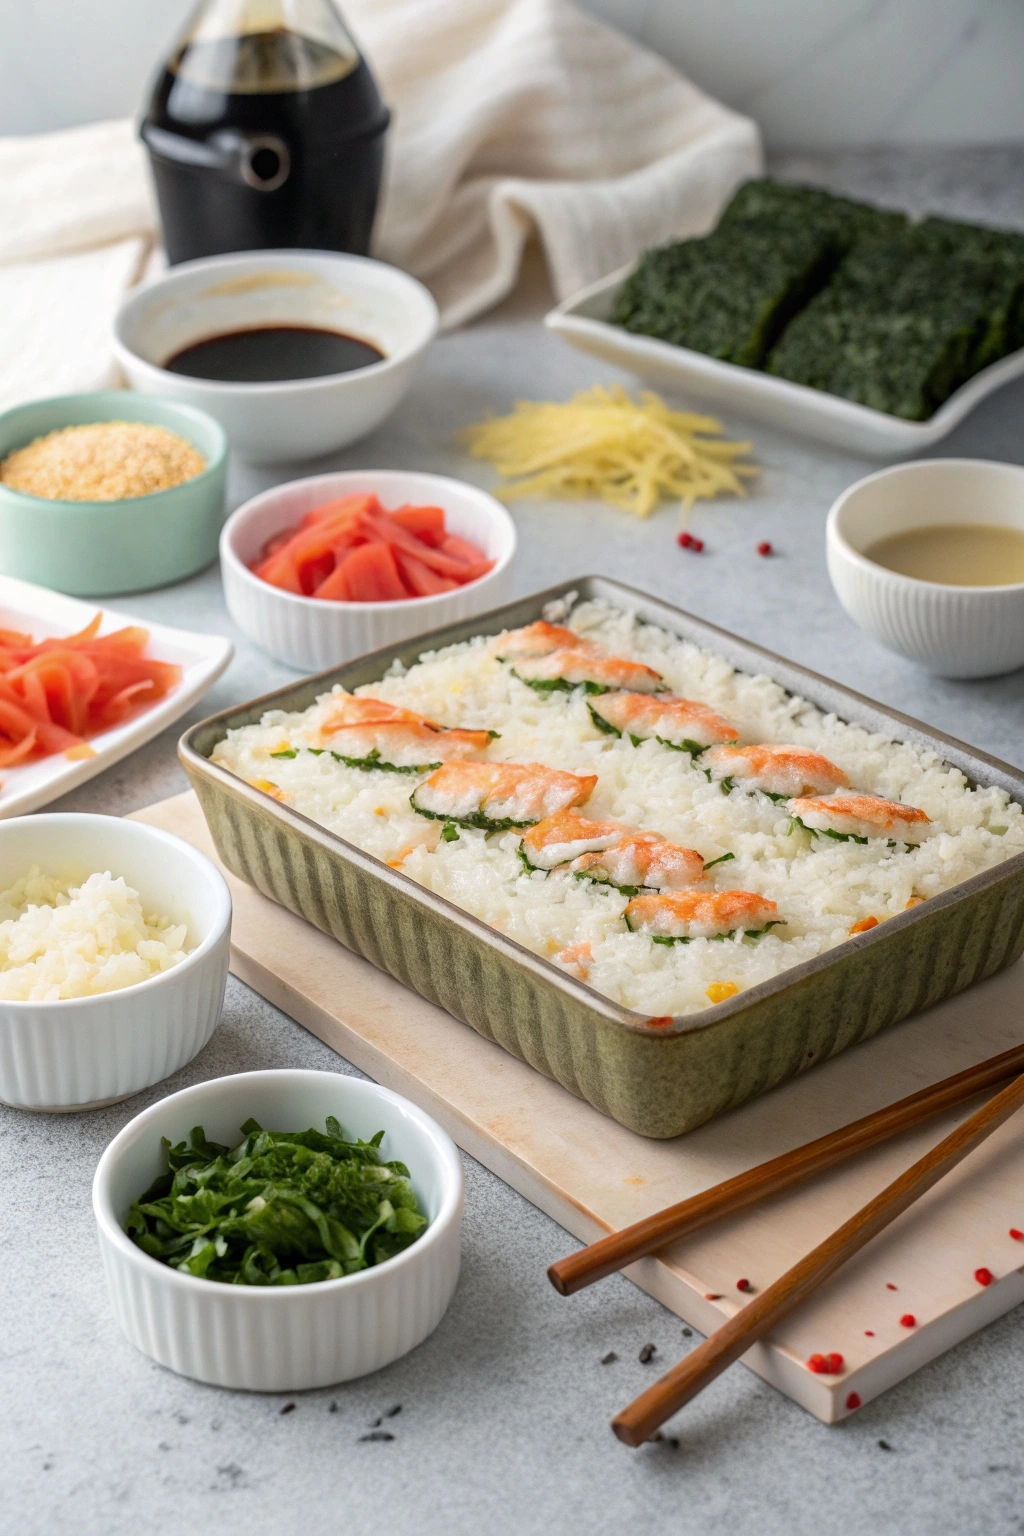
Step 1: Get ready for the Sushi Rice
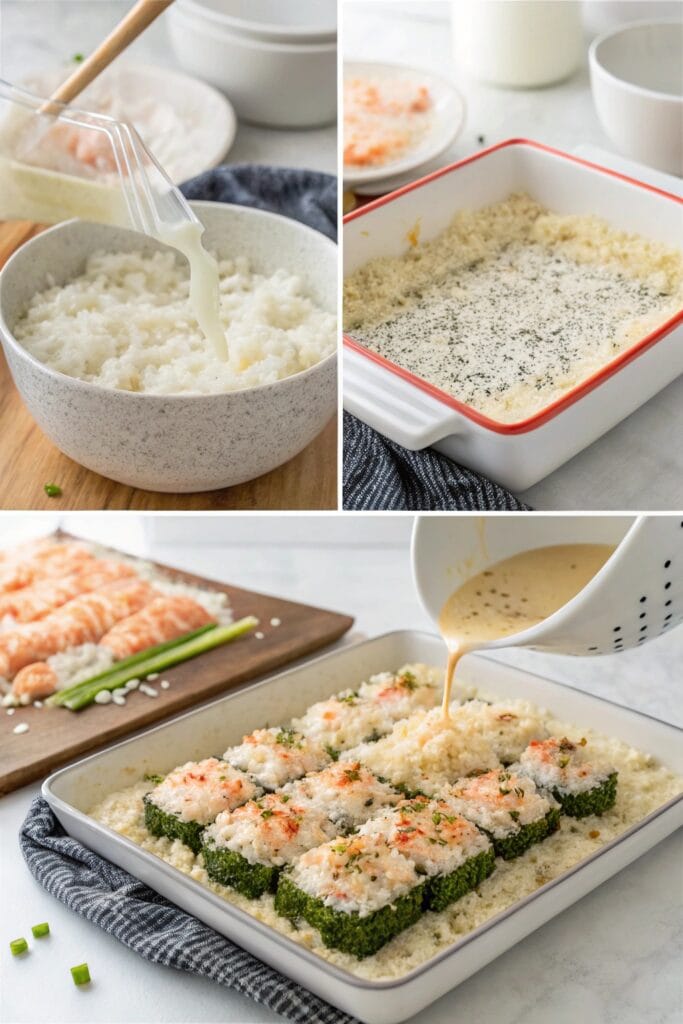
- Rinse 2 mugs of sushi rice beneath cold water until the water runs clear. This step is significant for accomplishing that culminating, non-sticky texture.
- Cook the rice with 2 ½ glasses of water in a rice cooker or stovetop until delicate and fluffy.
- While the rice is still warm, delicately overlay in a blend of ¼ container rice vinegar, 2 tbsp sugar, and 1 tsp salt. This gives the rice its signature tangy-sweet flavor.
- Spread the prepared rice equally in a lubed 9×13-inch preparing dish. Utilize a spatula to press it down delicately, making a firm base for your layers.
Step 2: Make the Velvety Crab Filling
- In a blending bowl, combine 8 oz of mollified cream cheese, 1 glass of Japanese mayo, and 1 tbsp of soy sauce. Blend until smooth and creamy.
- Fold in 1 lb of destroyed crab sticks (or your protein of choice) and 1 tsp of sesame oil. This filling is the star of the dish, so beyond any doubt it’s well combined!
- Spread the velvety crab blend equitably over the sushi rice layer.
Step 3: Include the Topping
- Drizzle ½ container of Japanese mayo over the crab layer. Utilize a spoon or spatula to spread it gently.
- Sprinkle ½ container of destroyed mozzarella cheese (or a blend of mozzarella and cheddar) over the mayo. This makes that brilliant, bubbly outside we all love.
- Finish with 2 tbsp of furikake for a burst of umami flavor.
Step 4: Prepare for Perfection
- Preheat your stove to 375°F (190°C).
- Bake the Sushi Heat for 15-20 minutes, or until the cheese is liquefied and bubbly.
- For an additional brilliant hull, broil for 1-2 minutes at the end—just keep an eye on it to dodge burning!
Step 5: Decorate and Serve
- Remove the dish from the stove and let it cool for 5 minutes.
- Sprinkle daintily cut nori strips, green onions, and sesame seeds over the best for a new, flavorful finish.
- Serve with discretionary sides like soy sauce, cured ginger, or a sprinkle of hot mayo.
Pro Tips for Success:
- Even Layers: Press the rice immovably into the dish to make a steady base. This makes cutting and serving easier.
- Broiling Tip: If you broil, observe closely—the topping can go from brilliant to burnt in seconds!
- Make-Ahead Alternative: Collect the dish (without preparing) up to a day in development. Cover and refrigerate, at that point prepare when prepared to serve.
Pro Tips and Variations
Now that you’ve mastered the basics of this creamy Sushi Bake, let’s take it up a notch with some pro tips and creative variations. Whether you’re looking to spice things up or cater to dietary preferences, these ideas will help you customize the dish to perfection.
Pro Tips for the Best Sushi Bake:
- Perfect Rice Texture: Rinse your sushi rice thoroughly to remove excess starch. This ensures your rice stays fluffy and not gummy.
- Even Layers: Press the rice firmly into the baking dish to create a stable base. This makes slicing and serving easier.
- Golden Crust Hack: For an extra crispy, golden topping, broil the dish for 1-2 minutes at the end of baking. Just keep a close eye to avoid burning!
- Make-Ahead Magic: Assemble the dish (without baking) up to a day in advance. Cover and refrigerate, then bake when ready to serve.
Creative Variations to Try:
- Spicy Sushi Bake:
- Add 1-2 tbsp of sriracha or chili garlic sauce to the crab filling for a fiery kick. Drizzle spicy mayo on top before serving.
- Seafood Lover’s Twist:
- Swap crab sticks for cooked shrimp, smoked salmon, or even a mix of seafood like scallops and imitation crab.
- Vegetarian Option:
- Skip the seafood and use diced avocado, cucumber, or marinated tofu as the filling. Add a sprinkle of sesame seeds for extra flavor.
- Gluten-Free Version:
- Use tamari instead of soy sauce and double-check that your mayo and other ingredients are gluten-free.
- Extra Cheesy:
- Add a layer of shredded cheddar or parmesan cheese on top for an even richer, gooey finish.
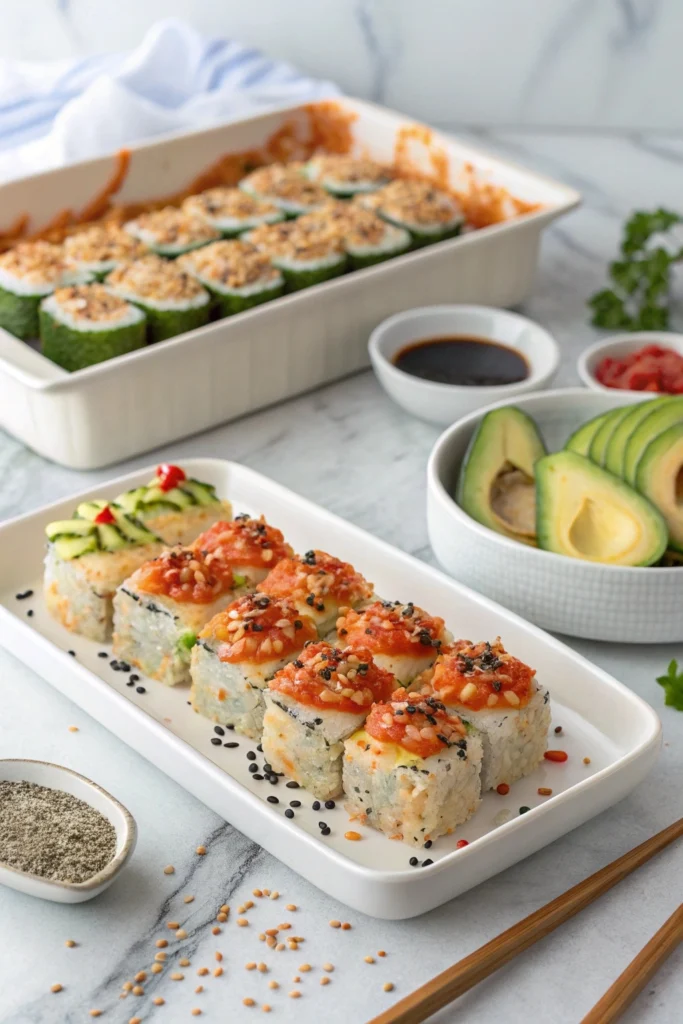
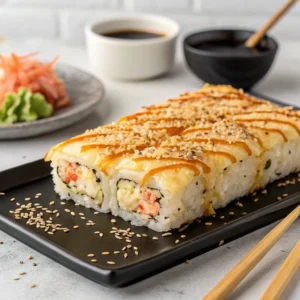
Serving and Presentation Tips:
- Garnish Like a Pro: Top your Sushi Bake with thinly sliced green onions, sesame seeds, and nori strips for a pop of color and flavor.
- Serve with Style: Offer small bowls of soy sauce, pickled ginger, and wasabi on the side for an authentic sushi experience.
- Portion Control: Use a spatula to cut the bake into neat squares or rectangles for easy serving.
Storing and Reheating:
- Refrigeration: Store leftovers in an airtight container in the fridge for up to 2 days.
- Reheating: Warm individual portions in the microwave or oven until heated through. Add a fresh drizzle of mayo or a sprinkle of cheese before reheating for best results.
Serving Suggestions
Now that your creamy, cheesy Sushi Bake is ready, it’s time to think about how to serve it in a way that wows your guests or makes your family dinner extra special. Here are some creative and practical ideas to elevate your presentation and pairing game!
How to Serve Sushi Bake:
- Family-Style Sharing:
- Place the baking dish in the center of the table and let everyone scoop out their portions. It’s a fun, interactive way to enjoy the dish!
- Individual Portions:
- Use a spatula to cut the bake into neat squares or rectangles. Serve each piece on a small plate or in a bowl for a more refined presentation.
- Sushi-Inspired Platter:
- Arrange slices of Sushi baked on a large platter, garnished with nori strips, sesame seeds, and green onions. Add small bowls of soy sauce, pickled ginger, and wasabi on the side for an authentic sushi experience.
Perfect Pairings:
- Side Dishes:
- Serve with a light cucumber salad, miso soup, or steamed edamame for a balanced meal.
- Add a side of tempura vegetables or shrimp for a crispy contrast.
- Drinks:
- Pair with green tea, jasmine tea, or a crisp white wine like Sauvignon Blanc.
- For a non-alcoholic option, try sparkling water with a slice of lemon or lime.
Garnishing Tips:
- Fresh and Vibrant: Sprinkle thinly sliced green onions, sesame seeds, and nori strips over the top for a pop of color and flavor.
- Spicy Kick: Drizzle spicy mayo or sriracha over individual servings for those who love a bit of heat.
- Citrus Zest: Add a sprinkle of lime or lemon zest for a fresh, tangy finish.
Presentation Hacks:
- Use Colorful Dishes: Serve your Sushi Bake on vibrant plates or in rustic ceramic dishes to make the colors pop.
- Garnish with Edible Flowers: For a special occasion, add a few edible flowers like nasturtiums or pansies for an elegant touch.
- Layer with Love: When plating, add a small bed of shredded lettuce or cabbage underneath each slice for added texture and visual appeal.
Leftover Ideas:
- Sushi Bake Bowls: Crumble leftover Sushi Bake over a bowl of steamed rice and top with fresh veggies like avocado, cucumber, and shredded carrots.
- Sushi Bake Tacos: Use nori sheets as taco shells and fill them with reheated Sushi Bake, crunchy veggies, and a drizzle of spicy mayo.
Conclusion
Congratulations—you’ve just created a creamy, irresistible Sushi Bake that’s as easy to make as it is delicious! Whether you’re serving it at a party, enjoying it as a family dinner, or meal-prepping for the week, this dish is sure to become a favorite in your kitchen.
Why You’ll Love This Recipe:
- Effortless and Fun: No sushi-rolling skills are required—just layer, bake, and enjoy!
- Crowd-Pleasing: Perfect for gatherings, potlucks, or cozy nights.
- Endlessly Customizable: Adapt it to your taste with different proteins, spices, or toppings.
Final Tips for Success:
- Experiment Boldly: Don’t be afraid to try new variations like spicy mayo, smoked salmon, or vegetarian options.
- Make It Ahead: Assemble the dish in advance and bake it fresh when you’re ready to serve.
- Share the Love: This recipe is a great way to introduce friends and family to the flavors of sushi in a fun, approachable way.
Your Next Steps:
- Tag Us: If you share your Sushi Bake creation on social media, don’t forget to tag us! We’d love to see your masterpiece.
- Try More Recipes: If you enjoyed this dish, explore our other easy-to-make, crowd-pleasing recipes.
- Leave a Comment: Let us know how your Sushi Bake turned out or share your favorite variations in the comments below.
Sushi Bake Recipe: Irresistibly Creamy & Easy to Make
Ingredients
Sushi Rice:
- 2 cups sushi rice 2 ½ cups water, ¼ cup rice vinegar, 2 tbsp sugar, 1 tsp salt
Crab Filling:
- 8 oz cream cheese 1 cup Japanese mayo, 1 lb crab sticks, 1 tbsp soy sauce, 1 tsp sesame oil
Topping:
- ½ cup Japanese mayo ½ cup shredded mozzarella, 2 tbsp furikake, 2 sheets nori
Garnishes:
- Green onions sesame seeds, sriracha (optional)
Instructions
Prepare Sushi Rice:
- Rinse, cook, and season rice. Spread in a baking dish.
Make Crab Filling:
- Mix cream cheese, mayo, crab, soy sauce, and sesame oil. Layer over rice.
Add Topping:
- Drizzle mayo, sprinkle cheese and furikake.
Bake:
- Bake at 375°F for 15-20 minutes, then broil for 1-2 minutes.
Garnish & Serve:
- Top with nori, green onions, and sesame seeds. Serve with soy sauce and pickled ginger.
Notes
| Nutrient | Amount |
|---|---|
| Calories | 350 kcal |
| Fat | 18g |
| Protein | 12g |
| Carbohydrates | 32g |
| Sugar | 4g |
| Fiber | 1g |
| Sodium | 600mg |
FAQs
Do you have questions about making the perfect Sushi Bake? Don’t worry—I’ve got you covered! Here are answers to some of the most common questions to help you always nail this recipe.
1. Can I make Sushi Bake ahead of time?
Absolutely! You can assemble the dish (without baking) up to a day in advance. Cover it tightly with plastic wrap and refrigerate. When you’re ready to serve, bake it as directed, adding a few extra minutes if needed.
2. How do I store leftovers?
Refrigeration: Store leftovers in an airtight container in the fridge for up to 2 days.
Reheating: Warm individual portions in the microwave or oven until heated through. Add a fresh drizzle of mayo or a sprinkle of cheese before reheating for best results.
3. Can I freeze Sushi Bake?
While it’s best enjoyed fresh, you can freeze Sushi Bake for up to 1 month. Wrap it tightly in plastic wrap and aluminum foil. Thaw in the fridge overnight before reheating in the oven.
4. What can I use instead of crab sticks?
Feel free to get creative! Try cooked shrimp, smoked salmon, shredded chicken, or even tofu for a vegetarian option. Each variation brings its unique flavor to the dish.
5. Is Sushi Bake gluten-free?
It can be! Use tamari instead of soy sauce and double-check that your mayo and other ingredients are gluten-free. Always verify labels if you’re cooking for someone with gluten sensitivities.
6. Can I make it spicier?
Definitely! Add 1-2 tbsp of sriracha or chili garlic sauce to the crab filling, or drizzle spicy mayo on top before serving. Adjust the heat level to suit your taste.
7. What’s the best way to serve Sushi Bake?
Family-Style: Place the baking dish in the center of the table and let everyone scoop out their portions.
Individual Portions: Cut the bake into neat squares and serve on small plates with garnishes like nori strips, green onions, and sesame seeds.
With Sides: Pair with miso soup, steamed edamame, or a light cucumber salad for a complete meal.
8. Can I use regular mayo instead of Japanese mayo?
Yes, but Japanese mayo (like Kewpie) has a richer, tangier flavor that elevates the dish. If using regular mayo, consider adding a splash of rice vinegar and a pinch of sugar to mimic the taste.
9. How do I prevent the rice from sticking to the baking dish?
Lightly grease the baking dish with cooking spray or a thin layer of oil before adding the rice. This will make it easier to slice and serve.
10. Can I make a smaller portion?
Of course! Simply halve the ingredients and use a smaller baking dish. Adjust the baking time as needed, keeping an eye on the cheese to ensure it melts and browns evenly.